
Chapter 16
APS Circuit Books
Read this chapter if you are interested in selling single stamps in APS circuit books.
| For more information, please see the APS web site: http://www.stamps.org/Services/ser_StampSalesDivision.htm |
16.1 General information
1. APS members can place stamps inside of small books. The stamps have to be identified with catalog number, catalog price and your requested selling price. At present, the sum of the selling prices of all the stamps in the book must not be less than $30. It may not exceed $500.
2. If you have a lot of stamps, you may find that using APS circuit books takes more time than you have available. It is relatively easy to put the stamps in the book, but it is very time consuming to properly identify and price each stamp.
3. APS circuit books may circulate for up to eighteen months. Counting time to prepare the books, mail them to APS, circulate them, and get you a check, you may wait two years before you see any money. There are also insurance fees and an APS commission. If you have a lot of money tied up in your material and want top dollar quickly, this is probably not the way to go.
4. You must be an APS member to sell from APS circuit books. Members may buy stamps from circuit books. Non-members, who usually have access to some circuit books at stamp clubs, may also buy. The APS member who has temporary possession of the books at the stamp club simply collects the money and sends it in as if he/she had personally bought the stamps. If you are not an APS member and wish to join, there is an application form in chapter 24.
5. You must use books that the APS sells. There are 3 kinds: the ones with the green covers have spaces for 96 stamps (16 pages with 6 spaces each.) The yellow books have room for 192 stamps (16 pages with 12 spaces each.) The blue books have pages with pockets on them. These are 14 pages. You would use blue books if you were selling first-day covers or something like that.
6. The APS also sells stamp mounts for use in the circuit books. There are three sizes of these, and they work very well. Circuit book regulations require that you use mounts that are closed on at least three sides so your stamps won’t fall out. The APS mounts form a little pocket that actually makes the stamp enclosed on all four sides.
The APS mounts are a little tricky to figure out how to use. At least they were for me. After a half hour, I had to call the Sales Division and ask. For those of you as non-mechanical as I, instructions are included in section 16.3.
7. Instead of mounts, you are also allowed to use hinges to mount your stamps. I would not recommend this personally, however.
8. When mounting your stamps, don’t be afraid to use up two or more spaces. I have sold souvenir sheets that took up an entire page. The only rule you must, must, must follow is that one stamp cannot be mounted so that it covers up the price of a second stamp. If you break this rule, APS will return your books to you so you can fix them.
16.2 Strategy tips for selling stamps in circuit books
Here are some strategy tips for selling stamps in APS circuit books along with some general do’s and don’ts. These are my personal opinions, and others may have different opinions.
1. Do not try to sell junk. (Pretty obvious, huh?) By junk I mean torn or badly damaged stamps. It won’t sell unless you price it really low.
2. Do not sell broken sets. Hardly anybody will buy a broken set. An exception is if all you have is the high-value stamp(s) in a set, you can usually find a buyer who bought the low-value stamps when he/she was younger and now wants to complete the set. Simply add the stamps to the book as individual items rather than sets.
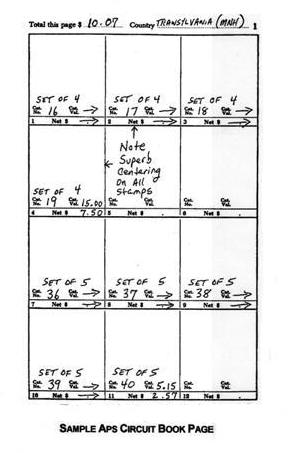
3. Do not be afraid to sell complete sets. Just mount each one in an adjacent square. Write “Set of x” above the catalog number of each stamp. I usually draw an arrow from one square to the next to make it easier to figure out what goes with what. Be sure it is clear that you are selling a set, otherwise you may end up with a broken set when you get the book back.
4. Do not try to fill up every square on every page. If you are not worried about the minimum value of the book, leave blank lines and blank spaces from time to time. I usually try to start a set in the left-most square. Using a yellow book, you can get two sets of 4 on one page. This leaves four blank spaces, but it looks better. The better the book looks, the more stamps you sell.
5. If you have enough stamps to meet the book’s dollar minimum, only put stamps of one country in one book. For example, it’s quite acceptable to have a book of just Pitcairn Island stamps. Many people get confused on this point as the APS does not have a circuit for Pitcairn Island. But you can still make a book with just Pitcairn Island stamps in it. And that’s important! Single-country books give the APS staff more flexibility as to which circuit your book can go in. (You do not need to worry which circuit your book goes in. What you want to do is give APS the flexibility to put it in the circuit that needs books now. The faster your book travels, the faster you get your money.)
6. If you do not have enough stamps to make a single-country book, try to add in some other country that is closely related politically or geographically. Since Pitcairn Island is British/Oceania try to find another British/Oceania country to go with it.
7. APS will take any combination of stamps you put in your books. If you decide to put Pitcairn Island in the same book with Paraguay, they’ll take it. However, there is nothing in common between Pitcairn Island and Paraguay. So your book will go in the “World-wide” category which normally moves very slowly. Try to keep your book as “narrow” as possible.
8. When writing in the squares of the circuit books, write close to the lines and not in the middle of the square. Purchasers need the middle of the square to put a rubber stamp when they remove and buy your stamp.
9. Check each issue of The American Philatelist for a list describing which circuits need books. The more APS needs books for a circuit, the faster you will sell your stamps.
10. Just because APS tells you they do not need books for a particular circuit, you can still submit them. A “hot” book may go out on six trips in an 18-month period. An “overstocked” book may only make one or two trips, or possibly none at all. In any event, APS won’t reject your book just because it’s on the current overstocked list. It’s your choice.
11. If at all possible, put your stamps in Scott number order. You are not required to do this; however, buyers like it. Be a salesperson, and give the buyer what he/she wants. (See section 16.3 for a tip on how to do this easily.)
12. If selling sets, it seems to work better if you put the total selling price for the set in the space for the last stamp. This is not a requirement, just a suggestion. If you do this, put a small arrow in the space where the two prices go on all but the last stamp. The arrows should point to the right (obviously). By not listing the prices of the other stamps, you also make it more difficult for someone to buy just one stamp by accident. (Collectors are constantly on the lookout to fill their own broken sets. If you give them the opportunity, they will be happy to buy just one of the four stamps in your set.)
13. If possible, segregate your stamps by condition. It’s better to put the MH stamps in one book and the used stamps in another. If you don’t have enough stamps to do this, you might consider putting the MH in catalog order in the front of the book then the used in catalog order in the back of the book. Put a note on the front like, “Mint/never hinged stamps on pages 1-6; used stamps on pages 7-14.”
14. Do not worry if you don’t use all the pages in the book. If you want to save postage, you are allowed to remove unused pages (in the green or yellow books) numbered 9 through 16. Cut them about 1/4 inch from the staples. Note: never remove the front cover, the back cover or pages 1 through 8. I have mixed feelings about cutting out pages 9 to 16. Personally, I do not do it.
15. Avoid using abbreviations. Some people do not know what MH means. Because of space (or writer’s cramp!), you sometimes are forced to use an abbreviation. If you want to write “Brazil (MH)” at the top of each page, put a note on the cover that explains what MH means.
16. Do not forget your costs in using a circuit book:
a. The circuit book itself (about 35 to 40 cents).
b. The stamp mounts (about 2 to 3 cents each).
c. Cost to mail books to APS.
d. 2% of your total asking price (sale price) whether it sells or not. This
is for insurance.
e. 20% of your asking price of everything that sells.
f. Cost to mail your hopefully empty books back to you insured.
If you are selling a $100 S.V. stamp at 50%, by the time you get through with the expenses, you will have less than $38. Just keep this in mind.
17. In general, high-priced items (sale price over $25) do not sell all that well unless they are very attractively priced. Be sure to take condition into account on these items.
18. Some of your stamps may get damaged in the circuit books. That’s pretty much a risk you have to accept. Be sure not to mount the stamps too close to the edge of the page. Also use mounts if you are dealing with stamps that have a tendency to curl.
19. Okay, here is the final and most controversial point. How should you price your stamps? The higher you price them, the more money you make. The lower you price them, the more you sell. (Gee, what a surprise!) There are 10 billion ideas on this. Here are my suggestions for what they’re worth.
Early USA in F/VF condition. You may be able to get 80% to 100% of S.V.. In VF to superb condition, you might even be able to get more than S.V.. Go lower if you do not want the stamps to come back.
MH, average centering, popular countries, 50 to 60% S.V., maybe 70% if you want to risk it.
MH, superb centering, maybe up to 75% S.V., but flag the stamp that it has great centering or nobody will notice! (Hint: write a note in the empty spot next to the stamp and draw an arrow to it.)
MH in the era where Scott gives prices for MH. 40 to 60%. Probably 50%.
MH in the era where Scott prices for MH, maybe 75%, but add a note to flag it as a special stamp.
MH in the era where Scott gives prices for MH, 40 to 60%. Probably 50%.
Used 40 to 60%. Probably no more than 50% in most cases. If it has a light cancel, maybe more, but put a note pointing it out. (Stamp collectors are always looking for a “better” stamp than they already have.)
We live in the age of Walmart. People are always looking for bargains. I tend to think a “half-price” sale still gets attention. However, do not be afraid to set your own prices any way you want. If you have a stamp that you think is very hard to find and very desirable (e.g., superb centering and MH), price it at 20% S.V. if you like! All of the “rules” in the world of stamps are flexible.
16.3 Tips
Tip #1: How to use an APS stamp mount.
A) Note that there is a white strip that says, “Remove to expose adhesive.” That message is printed in blue. Put the mount on the table with the blue message facing the table and the edge with the white strip closest to you.
B) Stick the stamp in the little pocket. The gummed side of the stamp should be up. The top of the stamp design should be closest to you. Push the stamp in as far as it will go. Be careful not to damage the perfs when they hit the end of the pocket.
C) Pick up the whole thing and pull off the white strip; however, leave everything oriented the same way.
D) Position the strip of glue so it is just below the top line in the square you want to insert the stamp into. If you are working on the top row, the envelope and stamp will actually be hanging off the top of the page.
E) Fold the mount back towards you, and then crease it with your thumb. The crease should end up even with the top line of the square.
After practicing with a few of these, you’ll probably get the hang of it! Don’t forget you can remove the mount and reposition it.
TIP #2: How to get your stamps in Scott order in the circuit book.
Piece of cake!
A) Go to the office supply store and buy a box of rectangular, self-adhesive labels. I like the white 5/16" x 1/2" that come in a box of 1,000.
B) Pick your first country.
C) Select a stamp you wish to sell in any order.
D) Stick it in a stamp mount, and look it up in your catalog or vice versa.
E) Take one of the rectangular labels, and write information on it. If you
write small, you can get a lot on info on it. I write in five pieces of
information:
1) Catalog number.
2) Condition (M for MH, U for used, H for MH--use whatever you want).
3) Catalog price.
4) If it’s part of a set, the number of stamps in the set. I usually draw a
circle around this number.
5) My selling price.
(If you can’t write that small, use two labels and buy a bigger size the next time.)
E) Paste the rectangular label on top of the “Remove Strip to Expose Adhesive” message. Try to get it centered. Set the whole thing aside.
F) After you have finished the entire country, clear off the table, and arrange the mounts in Scott order. That’s simple now. At this time you can check to see if you have met the minimum value for a book. If you haven’t, gather all the stamps up in numerical order and set them aside. Then do a second country. You can also check to see if you have exceeded the maximum value allowed in the book, or if you have exceeded the number of spaces in the book. I decide at this point if it would look better to use one or two books.
G) When you are ready to do a book, take the stamps in numerical order. Pull off the adhesive strip. If you positioned the rectangular label properly, it will come off on the strip. You can hold it in your hand and transfer the information to the square. Then stick the mount into that square.
H) When you get the page filled up, add it up and write the total at the top of the page.
I like this technique for two reasons. First, it makes it super easy to get things in Scott number order. Second, it keeps from having to go back and write on the pages after the stamps are in the book. If you wait until later to fill in information on page 1, you can easily damage the stamps on page 2 by pressing too hard with your pen.
TIP #3: The final thing I usually fill in is the summary information on the front of the book. Insert a piece of stiff cardboard behind the front cover before you start writing. That way you will avoid damaging the stamps on page 1. Collectors do not like stamps that have imprints from your ball-point pen on them.
TIP #4: You are required to assign a number to each book you submit. Keep them simple, like 1, 2, 3, 4, etc. If you submit a British Oceania book on 6/12/96, don’t call it BROC-960612-1A. Some person at APS in Pennsylvania has to type your book number on a postcard he/she returns to you to acknowledge receipt of your book. I am sure this person would appreciate a simple number. If you have to have a “unique” coding system, number your book 1 and write BROC-960612-1A beside it on a list you keep at home.
TIP #5: APS recommends that you do not “stack” stamps in a stamp mount,
i.e., don’t put 4 stamps in one square. There are many reasons for this:
1) the stacking may damage the perfs.
2) APS records each page on microfiche. The lower stamps can’t be seen.
3) APS stamp mounts are not designed to hold multiple stamps and may split
open.
There have been times when I had no choice but to stack stamps in a set.
This is because without stacking them I would have more stamps than squares.
The tip is, if you must do this, put a small piece of cellophane tape on
three sides of the stamp mount. This reinforces the edges so the mount does
not split open.

